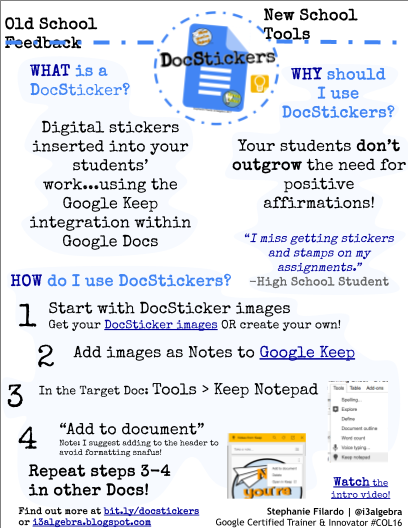
Recently, Google announced the integration of Google Keep with Docs. Google Keep has become a favorite for notetaking or quick "sticky" notes of things to remember. Google Keep is available
Google Keep has many functions. You can read about them at https://www.google.com/keep/ Some of my favorite features are the ability to leave myself audio notes while on the go and to color code my notes. I'm all about color coding, so my notes match the same color organization that I use for labels in my Gmail and folders in my Google Drive.
A feature that I am committed to learn more about and utilize to make it a habit is the Reminders feature. With Reminders, you can set a location-based reminder. Is there something you need to do as soon as you get to campus? Set a reminder and when you arrive at the campus, you will receive a reminder. Do you have a to-do list that you need to accomplish? Set a time-based reminder to make sure you never miss a thing.
Sign up here to receive an email with an incredible Google Keep Cheat Sheet!
With the integration of Google Docs, it only takes two clicks to move things from your notes to a Doc.
There are many ways for teachers and students to use Google Keep. Here are a few blog posts that can give you ideas!
In February, Google announced an improved feature in Slides. Previously, you could only insert video into Slides if it were a YouTube link. With the new update, users can now link videos saved in their Google Drive, as well as by searching YouTube and inserting a YouTube URL. As educators, the ability to save the time involved in loading all of your personal videos to YouTube is a benefit. However, I think there is an even greater benefit for our students creating presentations with video content. Some student-created videos simply do not belong on YouTube due to FERPA, parent permission, or other reasons. The ability to add video from Google Drive allows the students to set the video view rights to protect their privacy.
Once you select Google Drive from the Insert video field, you will see all videos in your Drive, including videos you may have in your Google Photo account (for more information on the greatness of Google Photos, see Kerissa Bearce's Google Photos blog post).
Not only do you have the ability to add your videos, but you can also set the videos to play only the specific parts of the video you would like your audience to see. Once your video is inserted, right click and select "Video Options".
From this menu, you can select a start and end time. You can also decide if you want the video to begin playing automatically when the slide opens or whether you would like the audio to be muted when it plays. These features are available for YouTube and Google Drive videos.
The autoplay features make it easy to set a timer on any of your slides to help facilitate classroom discussions or allow students to see how long they have for the task on the slide. The below video shows how to do this with a few simple clicks!
How will you use the new video feature? We would love to have your share in the comments! Now go create inspiring video content for your students' viewing pleasure!
Kahoot has been around for a while and is an engaging tool for formative assessments in the classroom. Kahoot recently added a new feature called Jumble. Rather than selecting the correct answer, participants must sequence answers in a correct order! This requires higher level thinking skills for students to sequence events, numbers, words, and more.
When playing a Kahoot Jumble, participants are given a question with four choices. Here are some sample questions I created:
(Play Equation Builder to see more math examples. Many of these examples require a deep understanding of the concepts in order to solve!)
Once the question is displayed, participants must place answer tiles in the correct order by dragging the answer choice onto a grid.
Want to see what a Jumble is all about? Play a sample game here.
Are you ready to create your own Jumble? Learn more here.
You can search for Jumbles created by others by searching your topic and narrowing your results to Jumble.
In October, I wrote about Let's Recap that is a web-based application or as an iPad app for students. You can read the full blog post here. Here are some of the ways Let's Recap is being used in the district:
Counting by 5s to 100
reading a passage for two minutes for teachers to assess fluency
Foreign language teachers having students respond to prompts to practice speaking fluency
Book reviews by genre
Exit ticket where students explain a process
and so many more ways!
Let's Recap is in its first year and in still in beta form. Since beginning in February 2016, there are now over 500,000 users! As expected of a beta program, Let's Recap is listening to suggestions and making changes! They just released an update with exciting changes.
After students respond to a Recap prompt, a video reel is created. Previously, teachers were unable to edit the video created. Not anymore! There is now an edit option on the daily reel.
Once edit is selected, you can select which students' videos should appear in your reel. You can also turn off the music and graphics that Let's Recap adds to the video reel.
This new customization allows teachers flexibility in deciding the number of video responses included in the reel as well as selecting the responses that best represent a topic or use of the summary reel.
The other new update is the addition of a specific due date. Prior to the update, teachers could select a closing date of 24 hours, two weeks, etc. Now, a specific due date and time can be selected for each Recap assignment.
Want to see how others are using Let's Recap? Check out these blog posts!
Project Based Learning: Essential questions and Many Uses of Recap by Rachelle Dene Poth (although this article is written through the lens of using it for responding to Essential Questions, the same concept would apply to using Let's Recap for student voice! Imagine actually hearing their voice through video reflections rather than a survey.)
Recently, Google released a new app to make the Google Photo experience even better. The app is PhotoScan by Google and it allows you to move your print images to the digital world! Using the app, you simply snap a picture of your picture, rotate your phone following the onscreen prompts and your photos are automatically cropped, rotated, and color corrected. Photos can be saved to your camera roll or sync to your Google Photo account (and if you aren't using Google Photos, then you may be missing out a photo storage solution that changes the way you interact with your photo memories). PhotoScan is both an Android and iOS app. You can read more about this app here.
If you would like a quick tutorial video, I've created a quick screencast to show you how to use this scanning tool .
letsrecap.com is a free video response application available on the web or as an app for students in the iTunes store. Recap allows a teacher to create a class and then post a question to either the entire class, a small group of students or an individual student. Students respond to the prompt with a video reflection. The teacher then receives a collection of all student responses.
Recap can be used as a formative assessment. A recap could be assigned to students at the end of the day as an exit ticket and then the recap video could be played the next day to reconnect students to the learning. Did your students learn a new concept in science and you would like for them to explain their learning? Assign a recap! Are your students learning a language? They could respond to a prompt to practice their fluency! Are your students reading various books and you would like to have a quick summary of certain elements in their book? Assign a recap! This is a great tool to begin to build a reflective practice with your students. If you would like to explore other ideas, read this blog post by Dr. Bryan Drost Recap Activities
When you sign up, select "Teacher"
You will then "Add A Class"
Name your class and determine how students should sign in.
Accounts can be created using a Google sign in. Although Let's Recap suggests this option for students, we currently suggest students using a code. Currently, if a student joins with their Google account, they can only be a part of one class. As a matter of privacy, if you were to share your class review reel, we suggest adding students by initials or first name only.
Once your class is created, click on "Get Class Pin"
A window will appear on the website for students to join and the class pin. Note: If students go to letsrecap.com they will not have the opportunity to enter the pin. Please note the sign in with a pin requires the URL letsrecap.com/classpin
Once your class is created, you can begin to create Recaps by clicking "Add Recap"
Your recap is automatically named by the date, but you can change it to meet your needs.
You can add more than one question. In addition, if you want your students to have a verbal prompt or you believe they may struggle to read your prompt, you can record a video for your question that will appear above your prompt.
After you have created your questions, you can choose to assign to your whole class, a group of students, or an individual student. Teachers then select the maximum time limit for the student responses. The options are 15s, 30s, 1 min, or 2 min. You can also choose to include an "Assess Yourself" poll. This feature allows a teacher to do a quick assessment to see how students feel about their learning.
As students respond, teachers get instant feedback and access to their recap video.
"Play All" allows a teacher to begin playing the reflections and Recap cycles through all students who respond. By clicking the three dots, an individual student's video can easily be emailed to a parent so they can share in the learning. Recap will then create a highlight movie of student responses that can be shared via a link! Here is a sample Recap Review Reel, My Favorite Story Currently, you cannot edit the Review Reel, but the app developers promise that option is coming soon!